I've done the sky map now, which should be used in all the outdoor scenes. There are two textures, which I've called "Gloomy Sky" and "Sunset Sky". One was an .HDR image, and one was a .Jpg image. HDR Photography is really useful in 3d design, and looks pretty sweet too. If you want to know a little more or see some pretty HDR photos, check here.
I'm not quite sure how experienced everyone is with materials and scene environments, so I'll upload, a material file (.mat) which can be loaded on the material editor, and that included everything all set up. There is the .max file which should have the material types set up in it if you dont know how to import .mat. I'll do the original images too.
You might need to know how the environment was done. If you press '8' or go to the render toolbar, you can open the "Environments" window (as below). You then drag your material from the material editor into there, or choose the .jpg or .hdr and drag that from "Environments" to the material editor. Either way, you want an instance in the editor, so that changes can be made to the one in environments.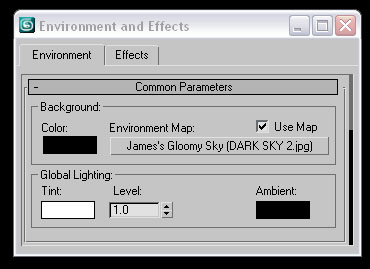
In the material editor, the most important thing, is to notice that it is not a texture map, but an environmental map, and its been changed to a spherical type.
I put the textures into Photoshop, and doubled the height of the canvas, to make the lower half black. This is for a couple of reasons. It means that the lower half will not create any light or strange colours appearing. It also means, that the image will only be stretched onto the top half of the sphere (i.e. not under the sea level).
Friday, 30 November 2007
Sky Map
Tuesday, 20 November 2007
More Tips
 The last meeting we had, I mentioned naming the objects correctly to make handling scenes easier for texturers and animators (even modellers adding to other people models). If you name an object such as a roof tile or something you know will be cloned many times, before the copy they will all inherit the same name such as "tile01" "tile02" and so on. Well I found a nifty tool today for renaming. Not actually hidden or anything, but theres so many tools in Max, I keep finding new things.
Its in Tools --> Rename Objects
You can select as many objects as you want, and the tool provides features to deal with the properly. In the screenshot I only had 6 objects all previously called plane. Also, do you notice the top toolbar has a dropdown menu? Thats for "selection sets" which are kind of groups of objects. In the image below, I used it to seperate objects into easily selectable groups. Unlike the annoying 'group' tool you can still deal with objects seperately if needed, which makes it handy for quick texturing, and changes such as scaling, without it acting as one big object like a normal group would. I mostly use it to hide/freeze/show things though, because when I'm modeling one type like ropes, its annoying to accidentaly select/move other things, and takes too long to find all the names etc to freeze them.
Saturday, 17 November 2007
A brief update
...because its been a while since I posted.
Well I've finished the model of my head/face now, dont have any renders handy, and I didnt blog at the end, so I'll get some of that stuff together explaining what I did and how/why. The hair was fun, styling it. I like those 3ds Max tools because theyre a lot less technical, and a lot more creative.
I only got hold of the files from Tim, for his ship, the other night, so I had a short time to do rigging etc. That isnt done, but its coming along well. I should be able to modify that once its done, to be used on the Victory. Its hard to get an idea of what the rigging actually is tied to, so its going to be a lot of guesswork. Anyway heres a shot of it so far (minus the actual ship because it takes up a lot of memory). I'll probably be in uni a fair bit this week, because I'm noticing my laptop being a lot slower than the uni computers with this 3d stuff.
Good news that we now have online storage. Well done to Sam for finding that. I talked to one of the uni IT tech's but he explained that basically the firewall is so tough, we cant do much, which is why FTP was out of the question.
Ah, and network rendering is not possible in Uni, however I know some good ways to split up long tasks. Batch rendering may also prove to be very useful to us. Batch rendering allows you to build a que of jobs, similar to how we print in the uni. All of our renders will be put onto a list, and it will render one after another. If time becomes scarce it could mean we could que a lot of jobs, without having to set them up each time one finishes (meaning it could be left to do 20 things over the weekend). Although come to think of it, as we have all the computers in the room at disposal, we might not need to do it.
I'll post again soon with some stuff I found useful, the outcome of my face model, and an update of the ship rigging.
Thursday, 1 November 2007
Modeling the head, neck and shoulders
I started trying to model my head, neck and shoulders a few days ago, but had a lot of trouble doing it, and a few other people said the same to me. It turned out that the tutorial was the best way of doing it. Here is my version, of 17mins of that annoying american voice, condensed!
- Draw a sphere from the side view. (that way the poles are around where the ears would go. This is because the poles are an awful mess of triangles, which you need to get rid of anyway)
- Squash it, and move it into place. You probably only need to scale it on the one axis, which is the left to right sides of your face.
- Use the modifier Edit Poly, that allows you to edit it as a Poly, without losing the original Sphere type object, so you can still control the amount of segments easily.
- Adjust the amount of segments, to match the amount on the edges of your face. You need to same amount to stitch them together. (It should be an even number, keep in mind that you will only use half, and then mirror it just like the face.)
- Now select the polygons that you want to remove. This should be all the triangles around the poles, the ones in the same place as the face, the left half, and whatever else you dont need. You are only trying to get a rough shape here, imagine a mohecan/mohawk haircut area.


Then by copying vertices, and creating polygons, stitch up that area, and you should get a basic head shape. The tutorial uses the left reference and draws more red lines in photoshop for topology guides, but it depends on what you find easier. I just went in, did it by eye, and used the left view to get the shape. Then theres a lot of tweaking to be done, but just using soft selection and the relax tool will work to get the right shape. I'll cover the neck & shoulders later.
