I've embedded the final video onto the group blog here
Sunday 16 December 2007
Friday 14 December 2007
Final Animation
I've seen the final thing now, with Richard's intro speech and the sounds which are cool. Also, whoever picked the music... nice choice :)
There are a few minor things I wouldve changed in the animation, but I'm being picky and its great overall. I'm happy with our planning as well, kinda glad we were set deadlines for models/maps/animations because I'm sure if we didn't, we probably would've fell way behind schedule.
Well done everyone.
Thursday 13 December 2007
Congrats!
Well, I've just seen a large file on humyo called BOT.avi, which I'm guessing is the final animation. I'm downloading it right now, can't wait to see it!
It's been great working with you guys, you all made a great team, both your work, and team skills were excellent. Thanks to Sam for keeping this whole thing together and not letting us get too sidetracked! and to Jo for picking a fun topic :D
I'm pretty sure I spent way too long modeling and mapping my head, but hey... at least it got used in the animation. 7 times apparently!? Someone send me that nelson model, theres fun to be had :)
Towards the end of the module I slowed down my blog postings, but I think at that point, we were all communicating a lot more over Instant messages, email and phone, so to be fair, we were still communicating as a team. So well done everyone, I'd be happy to work with
any of you again. Remember how you all thought I was blogger crazy... well look! you all posted more than me! Seriously though, blogging was a good idea, maybe we shouldve just used one blog with all of us as users like towards the end, but it still worked anyway. Cheers for the feedback on my posts.
Well, thats all folks, I'll post again once I've seen the final thing.
Ouch, splinters
 To carry on from the last blog post when I mentioned the scene of the mast being shot down, I'll just finish what I started. I took the material Tim supplied of the wood, and cut out a shard in Photoshop, using the lasso tool. I saved this (as a PNG to keep the alpha channel) and loaded it into the material editor in Max, to set the alpha channel as transparency. Then I changed the type to a face map, meaning that the image would be put on every face of the object its applied to.
I used a space warp called "Mesh Bomb" which shatters objects into its separate faces, and applies an animation which looks like an explosion similar to particle effects. I think in the final animation it'll be too small to see very well so I included a rendering below, so my efforts weren't to waste :P
Me and Panos worked on this scene together, I supplied these effects, while Panos' used his animation skills on the mast pieces, rigging and sails. (which were incredible)

Thursday 6 December 2007
Ball scale problem
 Well heres an odd problem. The mast was made from the detailed plans of the trinidad, and the cannonball was a rough estimate from the size of the holes that the cannons fire out from. If the ball was much bigger it wouldnt fit out the window, let alone get in the cannon! But still it looks puny in comparison, and the amount of damage it does... argh. I need advice.
Should I just make the cannonball bigger for this scene and hope noone notices the inconsistency?
Let me know what you think. I'n the mean time I'm working on getting splinters to fly off when it cracks. I'm trying out the 'Bomb' space warp to do that at the moment, but i'm thinking a particle system would be better. Perhaps someone can help me out on friday with that.
Friday 30 November 2007
Sky Map
I've done the sky map now, which should be used in all the outdoor scenes. There are two textures, which I've called "Gloomy Sky" and "Sunset Sky". One was an .HDR image, and one was a .Jpg image. HDR Photography is really useful in 3d design, and looks pretty sweet too. If you want to know a little more or see some pretty HDR photos, check here.
I'm not quite sure how experienced everyone is with materials and scene environments, so I'll upload, a material file (.mat) which can be loaded on the material editor, and that included everything all set up. There is the .max file which should have the material types set up in it if you dont know how to import .mat. I'll do the original images too.
You might need to know how the environment was done. If you press '8' or go to the render toolbar, you can open the "Environments" window (as below). You then drag your material from the material editor into there, or choose the .jpg or .hdr and drag that from "Environments" to the material editor. Either way, you want an instance in the editor, so that changes can be made to the one in environments.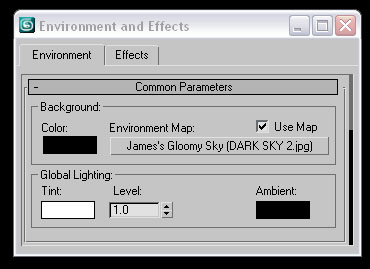
In the material editor, the most important thing, is to notice that it is not a texture map, but an environmental map, and its been changed to a spherical type.
I put the textures into Photoshop, and doubled the height of the canvas, to make the lower half black. This is for a couple of reasons. It means that the lower half will not create any light or strange colours appearing. It also means, that the image will only be stretched onto the top half of the sphere (i.e. not under the sea level).
Gloomy Sky
Sunset Sky
Tuesday 20 November 2007
More Tips
 The last meeting we had, I mentioned naming the objects correctly to make handling scenes easier for texturers and animators (even modellers adding to other people models). If you name an object such as a roof tile or something you know will be cloned many times, before the copy they will all inherit the same name such as "tile01" "tile02" and so on. Well I found a nifty tool today for renaming. Not actually hidden or anything, but theres so many tools in Max, I keep finding new things.
Its in Tools --> Rename Objects
You can select as many objects as you want, and the tool provides features to deal with the properly. In the screenshot I only had 6 objects all previously called plane. Also, do you notice the top toolbar has a dropdown menu? Thats for "selection sets" which are kind of groups of objects. In the image below, I used it to seperate objects into easily selectable groups. Unlike the annoying 'group' tool you can still deal with objects seperately if needed, which makes it handy for quick texturing, and changes such as scaling, without it acting as one big object like a normal group would. I mostly use it to hide/freeze/show things though, because when I'm modeling one type like ropes, its annoying to accidentaly select/move other things, and takes too long to find all the names etc to freeze them.
Saturday 17 November 2007
A brief update
...because its been a while since I posted.
Well I've finished the model of my head/face now, dont have any renders handy, and I didnt blog at the end, so I'll get some of that stuff together explaining what I did and how/why. The hair was fun, styling it. I like those 3ds Max tools because theyre a lot less technical, and a lot more creative.
I only got hold of the files from Tim, for his ship, the other night, so I had a short time to do rigging etc. That isnt done, but its coming along well. I should be able to modify that once its done, to be used on the Victory. Its hard to get an idea of what the rigging actually is tied to, so its going to be a lot of guesswork. Anyway heres a shot of it so far (minus the actual ship because it takes up a lot of memory). I'll probably be in uni a fair bit this week, because I'm noticing my laptop being a lot slower than the uni computers with this 3d stuff.
Good news that we now have online storage. Well done to Sam for finding that. I talked to one of the uni IT tech's but he explained that basically the firewall is so tough, we cant do much, which is why FTP was out of the question.
Ah, and network rendering is not possible in Uni, however I know some good ways to split up long tasks. Batch rendering may also prove to be very useful to us. Batch rendering allows you to build a que of jobs, similar to how we print in the uni. All of our renders will be put onto a list, and it will render one after another. If time becomes scarce it could mean we could que a lot of jobs, without having to set them up each time one finishes (meaning it could be left to do 20 things over the weekend). Although come to think of it, as we have all the computers in the room at disposal, we might not need to do it.
I'll post again soon with some stuff I found useful, the outcome of my face model, and an update of the ship rigging.
Thursday 1 November 2007
Modeling the head, neck and shoulders
I started trying to model my head, neck and shoulders a few days ago, but had a lot of trouble doing it, and a few other people said the same to me. It turned out that the tutorial was the best way of doing it. Here is my version, of 17mins of that annoying american voice, condensed!
- Draw a sphere from the side view. (that way the poles are around where the ears would go. This is because the poles are an awful mess of triangles, which you need to get rid of anyway)
- Squash it, and move it into place. You probably only need to scale it on the one axis, which is the left to right sides of your face.
- Use the modifier Edit Poly, that allows you to edit it as a Poly, without losing the original Sphere type object, so you can still control the amount of segments easily.
- Adjust the amount of segments, to match the amount on the edges of your face. You need to same amount to stitch them together. (It should be an even number, keep in mind that you will only use half, and then mirror it just like the face.)
- Now select the polygons that you want to remove. This should be all the triangles around the poles, the ones in the same place as the face, the left half, and whatever else you dont need. You are only trying to get a rough shape here, imagine a mohecan/mohawk haircut area.


Then by copying vertices, and creating polygons, stitch up that area, and you should get a basic head shape. The tutorial uses the left reference and draws more red lines in photoshop for topology guides, but it depends on what you find easier. I just went in, did it by eye, and used the left view to get the shape. Then theres a lot of tweaking to be done, but just using soft selection and the relax tool will work to get the right shape. I'll cover the neck & shoulders later.
Monday 29 October 2007
Modeling my face V

Alright, I think I'm done. NO MORE CHANGES! STOP IT!
I started doing some of the head & shoulders area, but am still a little uncertain of what to do. So I'm gonna check the tut's tomorrow to see how to start that. The ear is going to be a pain to model, and I just feel like getting this over with now, so I may rush it :(
When I get photoshop installed, I will edit the texture, because its perfectly symettrical at the mo, which is kind of weird actually. Ooh, and cover up the piercings, so I can model those instead of having them as a texture.

Sunday 28 October 2007
(attempted) Meeting of 26th Oct
Well sorry to be blunt, but I didn't think much of that meeting. It sucked frankly. My major concern is the way that we've divided out the work. For example we have Nelson himself. Ali will make him, and could spend as much time on the model as he likes. Perhaps he could wait until the last week to complete it. Then that would leave me with 1 week to create the clothes onto the body (cant be done without the body). Pass it on to the people animating it, and the people texturing it. We we all depend on the people before us. Its a mess, and too risky.
I realise in any kind of animation dev team like this, that's how its supposed to work, but we aren't professionals, barely know each others skills/styles, and we have a very close deadline. I would prefer it if we could divide the modeling out to everyone, then split the animation between everyone too. Or just have our own thing to work on all sides, like modelling, animating and texturing a character, or a cannon or something.
Other thing that bugged me, was in the meeting, about 5-6 people were shouting at once, only about 2 of them listening to anyone. I just gave up, put on some headphones. It seemed the usual lot took charge without asking anyone else, and tried to sort things out, but that didn't work too well. Sam, if you read this, you should of stuck about, we needed you as a project manager, but I cant blame you for leaving. Leah, I just read over the notes, thanks for keeping track of all that, I couldn't figure out what was going on. Ali, I text you asking whats going on with Nelson... no reply. I'm not doing Nelsons clothes, if you need some help though, just ask me.
So to sum up, I don't have a clue whats going on. If you want to be a team, and communicate like adults, then we can sort something out. The modellers are well off, but if your an animator, just think whats going to happen if you don't get your models until too late. The longer the modeller spends on it, the better mark he/she gets, the worse yours is. We need to restructure this or we're going to end up unintentionally screwing each other over. I needed to vent that, sorry, it's not directed at you all!
I better get some more sleep before coming in next time :P
Thursday 25 October 2007
Modeling my face IV
 I only worked on the eyes today. I was trying to get more detail around them, like eyelids, creases and so on.
Crease is a great tool to use on edges. You just select the edges push the button, and it puts a crease there! Nice and simple :)
The problem I just realised I've had, is that the area/shape around the eye changed without me noticing. I'd advise you, when using the relax tool, to keep an eye on the area around where you're working, because it can affect too much sometimes. Now I've got to tweak the nose, cheek and brow back to how it was :( The face stuff is starting to get on my nerves, so after this I just want to get on with fixing it onto a head, and getting all that over and done with.
Oh, and something I would really suggest, is once youve got the general face shape, to put your front photo on as a texture. That way, instead of trying to look through it, and at different angles, you can actually move things slightly, to get them in the right place. It really helped me, because you can see if the nose is slightly too high, or if your creases are at the wrong angle etc. Anyway, if you want to do that, use UVW Map modifier on your face, and use the 'plane' type, and just move the gizmo around, and adjust the height/width to get it right. If your photo (like mine) is uneven, you can use the material editor to crop half, and mirror it in the settings above.
Wednesday 24 October 2007
Cannonballs
I made a cannonball! lol... that was hard :P Hehe, they're just spheres, but it was good to have a glance at some of the textures avaliable and what can be done with them. Suprisingly, the Metal_Rust texture is awful, and Metal_PlateOX is much better in terms of rusty metal. I had to modify it a little, so that it was black and shiny, and didn't look like grey concrete. To do that, I just made the diffuse map, a "Mix" type, which means you can mix two textures into one. So I just took the rust looking one, and mixed it with black.
The wooden floor is Wood_Old and it seems to work nicely. I think we'll end up using that on the ship, quite a bit.
Modeling and firing some of the other types of ammo should be a bit more interesting though, the grape shot looks really odd, and the one that splits in two with a chain as well.
Cannon
I decided to give the face a break today, it gets a little tedious after a while. So instead I built a cannon! I figured we can get on with building some basic props like this before knowing the exact storyboard, and I'd already collected some reference photos anyway. I tried two methods of making the barrel; lathe and loft. I ended up sticking with lathe because it was so much easier to tweak and add detail, than dealing with separate shapes, then curve editing.
It's going to be fun to use with Max's physics system, because the barrel should be able to actually fire a ball from it. Can't wait to animate it, and have some flash & smoke, make it roll backwards when it fires :) I want to upload the .max file to share, but realized if we are going to be working as a team, we need some online space, like FTP or a wiki, where we can share all our files, and work collaboratively. Actually I've got a few ideas, and want to let you know about a few other cool tools I've found while working in a development team lately, so I'll get some stuff together and post about it later.
Oh... Click the top image to see full size.
Monday 22 October 2007
Modeling my face III
 As you can see I've done some more work on the lips, which I'm happy with now. The texture should add most of the detail to them, because its the colour that defines where the lips begin and end, not so much the shape of them. They were sticking out too much before, a bit fish-like I think.
I also cleaned up the forehead a little. That was a pain, because the relax tool wouldnt work on the central area, because it ignored the central line of vertices, So I just had to do some vertex tweaking.
The eye area is next on my list. I added an eyeball, but just as a visual aid. I took the default eyeball material from Max, and just chucked it in GIMP to change the colour from brown, then mapped it on a sphere.
Oh, thanks to Lara for the tip on using the Symmetry tool. It works great, much better than mirror, because you can change one side and affect both, and Max still regards it as one shape. It even has a checkbox to automatically weld the two sides together! No more meshsmooth issues from having two objects...
Wednesday 17 October 2007
Modeling my face II
 I've spent possibly too much time on facial sculpting (I'm a perfectionist, I cant help it), so I'm fairly happy with the basic shape now. I'll probably be making more tweaks every now and then anyway. But I've got around to sorting the nose out, its still a bit wide, and needs some more work, but it'll have to do for now, because I want to get on with the lips and eyes. I had a quick attempt at the lips, but the mesh smooth really mucks things up, even when using vertex weighting.
I'm a bit annoyed, that I spent a long time resculpting the chin, almost perfected it, then realising that I had done it on a version I didnt want to keep, now its back to pointy land. Oh well, save it for another day.
Has anyone got any tips on doing the lips? I'm sure the texture will be most of it, as the colour really defines the shape somehow.
I found a few good tools that I'd highly recommend using:
- "Relax" tool can be found on the vertex subgroup of the object, and it basically takes the selected vertices, and evens them out a little, like an average. Use the custom settings for it though, and you can do wonders getting rid of annoying bumps and dips in the face, without the aid of smoothers.
- "Retriangulate" is a polygon tool, which will redraw your quads, with the inside edge being optimised. What does this mean? Well I've taken an example below, to show you how the same quad can look very different. What you must remember when working in 3Ds Max (and possibly all 3D software, is that every face(polygon) is a set of triangles, so quads are simply two triangles. Retriangulate will try to choose the best looking option, so selecting ALL polygons and using this will improve your model greatly. If you dont trust the computer to do this, or it just comes out a bit messed up, use "Edit Triangulation" to draw the centre line manually. It saved me going crazy a few times.
- I'm sure you all know of soft-selection by now, I'd still recommend using it for softer areas (duh!) such as cheeks and chin. The 'bubble' factor is worth using, so you get the right curves.

Tuesday 9 October 2007
Tips!
I saw on Sam's Blog, she wrote about 3ds Max crashing and losing work, so I thought I'd share with you all some tips and the cool features Max offers.
- 3Ds Max by default, makes backups every 5 minutes. You can configure this in the 'Preferences' window, 'Files' tab. They are normally saved to:
- *EDIT*
- 3Ds Max 9.0 seems to save in your Documents folder, instead of the program folder. On mine (Vista) its found in:
- In the 'Preferences' window, change the default "Scene Undo" levels. Its set on 20 or something ridiculous by default. Push it up to 500, so even when you make a huge amount of changes you undo them all.
- You can right-click the Undo buttons to see what changes were made, and jump back to them. Kinda like the Photoshop history tab. Not that useful, but handy when undo steps take ages because its a big file/low memory.
- When working on intense bits or you can tell the computer is struggling, just hit CTRL+S often, and you shouldn't lose a thing.
- Use versioning when saving, like face01.max face02.max and so on. I do this for major phases, like between modeling/mapping or just a new one for each hour/day. Then you have older versions to go back to. Keep in mind, some of the things you do in Max can't be undone. (for instance, converting object type and making animations from the physics engine which we will probably use.)
- Everything turning into cubes when you move? It switches on when you use up too much memory, or just catch the key by accident. Use 'O' to toggle that on and off.
- The "Gizmo" (3 axis thing for controlling move/rotate/scale) disappeared? Just press 'X' to get it back.
- Wondering why when your working with vertex, you press a normal key to change the view and it screws up the whole object? Sorry, I haven't figured that one out yet! ;)
Monday 8 October 2007
Modeling my face I
 I've now moved out all the vertices, so that they are laid out in the 3 axis. I spent quite a long time tweaking it to get it as accurate to my face as possible. There needs to be more work done on the nose, eyes and lips obviously, but I'm happy with the rest of the facial structure. I think the defining parts of my face are the cheeks and brow region, they can make a face look very different if altered.
 I did this in Uni before, but didn't save because I wasn't too pleased with it. I tried using my photo as a texture map for the face, but it was just for fun really, because I'll be making more changes, and I believe mapping should only begin after the modeling stage is complete.
I used a NURBS type mesh smooth, with 2 iterations to soften the edges, as you can see in the top two wireframe photos the amount of edges are increased. It's also useful because it means I now have more edges to play with, so I can actually define the detailed areas.
A few tips I'd recommend to everyone, that I found while doing this:
- Keep a mesh smooth filter on all the time, but don't adjust the vertices/cage of that, just flip back to the original blocky edges when you want to make adjustments, and see how it looks with the smooth on.
- Use NURBS smoothing, instead of quad or classic. They both produce unwanted details and blockyness.
- Use the Mirror tool (next to 'align' on the toolbar) and choose 'Reference' as the type of clone. It means you can keep working on just the half you want, and all changes will be updated to both sides! Remember to delete the reference after.
- Play with the opacity! You can see through your model onto the reference plates.
- As well as the reference plates, I found using UVW Map, Plane type on the model, with your photo as the texture, can help you see if some parts are slightly off. Also comes in handy when working in Perspective as opposed to the left and front only views.
- When its complete, take off the smooth first, use Mirror again to create a clone, attach the halves, and weld vertices. Then reapply the smoother of your choice.


Friday 5 October 2007
Modeling from reference plates
 I just finished the next step of modeling, using photos of my face as reference plates in 3Ds Max. I drew quads using the line tool, over the topography that I already mapped out on Photoshop. I converted those to Poly, then attatched them all into the same object, selected every vertex, then used weld, so that it formed one large flat surface, with the edges following the right features of my face. As i've done this before, I imagine the next step is to start dragging these vertex back using the left view, so that they are spread out on all 3 axis. Then create a mirror, or reference version, and stitch them together to make the entire face! After that, I'm not really sure where or how to start attatching this onto a head or body.
Well, I'm done for the night, see you all tomorrow.
Thursday 4 October 2007
HMS Victory website
I found a good site today, loaded with information on the HMS Victory. Nelson was onboard the Victory during the battle, and it lead the Weather column, which was the spear of ships breaking into the front of the enemy fleet. It has stats and facts on the ship itself, and lots of photos that we can use as references, making it a great place to start designing the ships from. You can find the website here.
Free software alternatives
To those who were thinking 'wtf' on my last post, OpenGL and Direct3D are languages used to make 3d graphics appear on your screen in an interactive mode, like for games, and 3D software like we use! DirectX is a Microsoft package, its used on some of their consoles too, and includes components made to deal with sound, graphics, input devices etc, which is nice in some ways. However it is not compatible with other OS's and not very free or open unlike open-source software. OpenGL however, which some of you know I have an interest in, is open-source software, meaning its free as in beer and free as in speech. We are legally allowed to know how it works!
Free software is very important, although its usually shrugged off as cheap or inferior, as developers choose to share it, and don't demand money to use it. I'd recommend learning a bit about the free software movement even if you have no interest in coding. I know as we're students most of us have probably just downloaded cracked versions of expensive software (lets admit it... ;) we all do it!) but there are some incredible free tools out there, believe it or not, better than ones that demand money.
So check them out sometime, instead of stealing and installing Photoshop, try out the GIMP, instead of 3Ds Max, consider downloading Blender, or get Open Office as a replacement for the MS Office package. You can even get tiny cut down versions for installing on USB keys! Keep in mind, instead of getting a tool made by a small team in an office, you get a team of thousands of developers, and as for support, instead of one company who charges a shitload for a phone call you get Millions of people and communities online that want to help you for free!
Anyway, hope I didn't bore you too much with that, just sharing the info, giving you options you might not have realised you had before.
3Ds Max on Vista
As some of you know, I've been stuck with MS Vista on my laptop until I get a new hard drive to get my *nix on, sorry, this is probably too geeky for you guys...
Anyway! Autodesk claim that 3Ds Max will not work with Vista, and the interwebs are full of people complaining about this and trying to fix it etc, but for some reason I managed to install and run it today. So I just thought I'd say, don't be put off by the rumours, if you run Vista, it may still be possible. I'm using Vista Home Premium and 3Ds Max 9.0.
There is a dll/memory error on load, but it seems to work fine apart from that. I'd recommend changing graphics mode to OpenGL if using 9.0, as its better, and previous version had it set as default. I don't know why they changed it to Direct3D/DirectX by default, but its fucking glitchy on my laptop.
Topology

Today I took some photos of my face, to use as reference plates while creating my face in 3D. I chucked them into Photoshop to add a bit more detail, sort out perspective and so on. Adding the topology is the main (and irritating part) as it helps if you figure out in advance how you want to lay our your faces & vertexes.
So... I set up some guides to make sure my front view and left view were even and the same scale, added the blue on facial creases and protrusions, to get an idea of the general layout. Then added the final 'anatomy of a spiderman' looking red lines.
Its funny, my piercings ended up being really useful for aligning the left and front views. Although they also ended up showing me that my left view photo was at a slightly weird angle, which is a shame.
Now I'm set to put this onto a plane in 3Ds Max, and get modeling. There are some strange bits on the topology that i'll just have to sort out in 3Ds Max when drawing lines, no triangles or anything, just really weird bits I got sick of trying to fix in Photoshop.
Meh, not tonight though, I can barely keep my eyes open.
Laters!
Monday 1 October 2007
Blogger language fix
Hey, I just thought I'd post a temporary fix I've found for us UK users of Blogger, that find the odd section of the site being displayed in German.
Go to your Dashboard, select the drop down menu for 'Language' and change it to "English" (or "English-English" :S) as opposed to "English (UK)"
You see the problem is, English is obviously an American language, and the language that we speak on this tiny island is clearly so similar to German, the yanks thought we wouldn't mind a bit of variety.
Also, I found my timezone was 8 hours behind, so if you want to come out of the past and change to GMT, you can go to Dashboard --> Settings --> Formatting and change it on there.
Anyway, I hope that is some help to you guys, sprechen Sie mit Ihnen später!
Late night rambling
Well I'm still in Chelmsford as I've been doing some work up here on a website/business I'm starting. Launching any hour now, and our developer is still coding, so its total bedlam! I haven't had a chance to do much for this project as my laptop doesn't have 3DsMax or Photoshop installed yet, and I don't even have a camera with me to take a photo of myself!
Fortunately I've done a similar thing before, sculpting a head from a photo, although there are still many new things to me too, like laying out the vertices from facial features like cheek bones and wrinkles. What an excellent idea! Well done and thanks for the great set of tutorials Eric Maslowski!
So I'm hoping to get home in a day or two, and get on with making a 3D version of my head. I've never texture mapped a head/face either. Strangely enough I've always been satisfied with UVW map for texturing, and have never used UVW Unwrap! I remember plenty of times as a kid, going through the files from computer games finding these funny photos of stretched out character faces, and just laughing at them!
Now I know they are the texture maps, but still wonder how they know how to stretch them out, and how they are even generated from photos.
Friday 28 September 2007
Hello world!
Well as this is my first post, I guess I should let you know a little about the project that I'll be blogging about.
I am working in a team of about 15 students to produce an animation based on the famous battle of Trafalgar! Hopefully this project should give us all a chance to hone in on our individual skillsets over the next twelve weeks. I've worked in dev teams before, but never on 3D animation, so I think this will be a great learning experience.
I'll be updating my blog frequently (as will the other students) so we can all keep track of progress and share any worries with each other freely, and boost the communication of the group.
ttfn!
Subscribe to:
Posts (Atom)
