I've done the sky map now, which should be used in all the outdoor scenes. There are two textures, which I've called "Gloomy Sky" and "Sunset Sky". One was an .HDR image, and one was a .Jpg image. HDR Photography is really useful in 3d design, and looks pretty sweet too. If you want to know a little more or see some pretty HDR photos, check here.
I'm not quite sure how experienced everyone is with materials and scene environments, so I'll upload, a material file (.mat) which can be loaded on the material editor, and that included everything all set up. There is the .max file which should have the material types set up in it if you dont know how to import .mat. I'll do the original images too.
You might need to know how the environment was done. If you press '8' or go to the render toolbar, you can open the "Environments" window (as below). You then drag your material from the material editor into there, or choose the .jpg or .hdr and drag that from "Environments" to the material editor. Either way, you want an instance in the editor, so that changes can be made to the one in environments.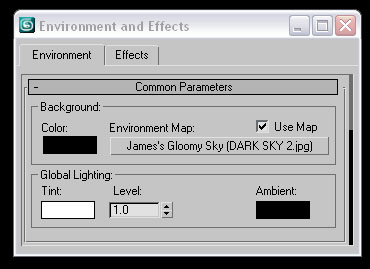
In the material editor, the most important thing, is to notice that it is not a texture map, but an environmental map, and its been changed to a spherical type.
I put the textures into Photoshop, and doubled the height of the canvas, to make the lower half black. This is for a couple of reasons. It means that the lower half will not create any light or strange colours appearing. It also means, that the image will only be stretched onto the top half of the sphere (i.e. not under the sea level).
Friday, 30 November 2007
Sky Map
Gloomy Sky
Sunset Sky
![]()
Subscribe to:
Post Comments (Atom)

1 comment:
I think the gloomy sky map looks really good. This should look really good when everything is animated!
Post a Comment